Showing posts with label HMG. Show all posts

Wednesday, May 18, 2011

Take Some Cover! Garrisons in RTS games Part Two

View Part One

Company of Heroes
Company of Heroes, a World War II RTS released by Relic Entertainment, features the most detailed garrison system of any game I have played. Unlike Red Alert II or Command & Conquer Generals, troops inside buildings can be hurt by conventional weapons. They receive improved protection but are not invulnerable. Additionally, each building in Company of Heroes offers different levels of protection. Troops in wooden buildings receive less protection than troops in brick building. Larger buildings also tend to offer better protection than smaller ones, particularly from grenades and other anti-garrison weapons.
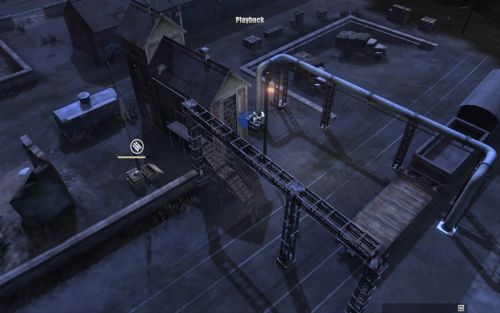

For example, the large brick and metal industrial building in the center of this picture provides great protection for troops inside.

A brief explanation of Company of Heroes squad based infantry system may also be useful. Instead of building individual soldiers you construct a squad of troops which can range in size from two to six individuals. For example, a United States riflemen squad consists of six members. A German Wehrmacht Pioneer unit consists of two members. These squads can be upgraded to have different equipment and weapons as well. For instance, a riflemen squad upgraded with the Browning Automatic Rifle option will have six men wielding three M1 Garand rifles, one carbine, and two BARs.


A two man Pioneer squad with the flamethrower upgrade.

This squad based system is important for assessing the offensive potency of buildings. Unlike in Red Alert II, where every soldier inside a building can fire at attackers, in Company of Heroes every window or other opening allows only one soldier to fire out of it. So if a building has three windows on one side, only three soldiers inside the building can fire out at troops attacking from that side, even if there is a full six man rifleman squad inside. If a building only has one window on a side, only one soldier can fire out from that area. Some buildings have sides with no windows at all-these can be attacked without fear of reprisal by enemy troops. One interesting side note is that some explosive weapons, like tank shells or bazooka rounds, can open new holes in buildings that defenders can fire from.


The building in the lower right of this picture can have up to three soldiers firing out of its left side but only one at a time from its south side.

This is very important to keep in mind both when garrisoning troops and when attacking a building. Troops in the open may be able to defeat garrisoned troops if they attack from a side with few windows and will always win if they attack from a side with no firing ports at all. All of the attacking troops will be able to fire but only one or two of the defenders will be able to return fire. Although the defender is replaced by another member of the squad when he dies, the difference in firepower can be fatal to the defending squad.

If you attack a building from more than one side at once, any extra available soldiers will fire out at the troops coming from the different direction. For instance, if a four man Wehrmacht Grenadier squad is in a building that has two windows on the right side and one on the south side and the building is attacked from those two sides, two men in the squad will fire from the right and one will fire from the south.


The building in the upper left illustrates this point.

Like in Command and Conquer Generals, there are some weapons available in Company of Heroes that inflict extra damage to garrisoned troops. Grenades and flamethrowers are the two most readily available building clearing choices. Grenades can be upgraded or are immediately available for many of the infantry squads for each faction, flamethrowers are an upgrade available for the engineer type units of each faction.

Damage from a flamethrower depends on the size of the building-soldiers in larger buildings will die slower than ones in small buildings. So large metal buildings like the one in the first screenshot on this post will be difficult to kill quickly with a flamethrower team but small wooden shacks will probably result in almost instant death for the squad inside.

Grenades do extra damage to troops in buildings, but it is important to keep in mind that the damage from a grenade depends on where it is flung in the building. If you throw it on the opposite side from where the troops in the building are located it will not do much damage.


As this grenade was hurled right at the enemy machine gun team, it should at least inflict heavy damage to and possibly kill the entire squad.

Garrisoned heavy machine gun squads add a great deal more strategy to buildings in Company of Heroes. When they are in the open they can only fire in a certain arc and take some time to redeploy when they wish to attack troops coming from a different direction. They are also extremely vulnerable to troops coming from behind them. When placed in a building they can fire in all directions that windows are available and receive some protection from enemy fire. Heavy machine guns are devastating weapons because they suppress enemy troops. This causes them to squirm around on the ground, take more damage from fire, and be unable to fight back effectively. HMGs are a great way to slaughter an opponent who relies on massed infantry attacks.


This MG is suppressing a large number of British troops.

However, garrisoned MGs have two major weaknesses. One is that once a target has been acquired they are stuck firing at that target until it is dead, out of range, or out of the arc of fire available from that side of the building. The other is that it takes them a moment to acquire an enemy when they redeploy to a different side of the building. This allows two major strategies to defeat them.

One option is to use one infantry squad as bait-drawing the HMGs fire while other infantry units move from a different direction to destroy it. This can be a quick way to deal with a troublesome MG, particularly if you have grenades or flamethrowers available in the assaulting squads. The main risk of this strategy is that you can sometimes take heavy casualties in the baiting squad or lose the squad altogether. Ideally the squad used as bait will be in some sort of cover so that they are not slaughtered in the open.

The other option is to use the tactic of building circling, where you move a squad right next to the building and run circles around it while the MG has to keep redeploying to try and open fire. This takes a bit of time but the MG will eventually be killed by the circling squad. This strategy will only work if there is an avenue to advance on that has a blocked line of sight for the MG. The other risk is that sometimes one soldier in the squad will lag behind and be hit by the MG, causing his entire squad to be suppressed. If this happens, that necessitates a retreat.


This rifleman squad used the hedge to get close to the building without being engaged by the HMG and are now circling the building.

However, the most important part of the garrison system are that buildings are placed in key strategic locations on the map. Company of Heroes differs from many other RTS games in that players must capture and control points on the map to gain resources rather than use workers to harvest resources. Additionally, they must hold territories linking them to that location. This means that protecting those points from being recaptured by the enemy is extremely important. On many maps, buildings overlook the most valuable resources or the capture points that are required to link a player to those resources. Without that fact, the detail in the garrison system wouldn't be as important to the game. In comparison, Command and Conquer General's maps are usually large enough that there is a direction to attack that bypasses all neutral structures, making it relatively easy to avoid dealing with garrisoned soldiers.

That covers the detailed garrison system of Company of Heroes. Consider how it compares with Red Alert 2 and Command and Conquer Generals. The player who wishes to assault a building is forced to think much like a sergeant or lieutenant on a battlefield would have to. Which side has the most protection for my men? Can we throw a grenade in there? The garrison system adds a lot of tactical depth that is not present in the other systems.

Why is this additional depth important? It goes back to a point that I made about weapon options in FPS games. If there is a single best option for all choices, such as the M16 being unilaterally better than the Famas in Call of Duty Modern Warfare 2, there is no choice to be made. The player who wishes to win will always pick the M16. That is how the garrison system of Red Alert 2 works-the only time you wouldn't want your conscripts to be in a garrison is when there is no building to be found. Command and Conquer Generals added a few weapons that instantly kill garrisoned infantry, a change that meant that buildings wouldn't always be the best choice for the placement of troops. Company of Heroes system has enough detail to keep an entire game going around a key building as each side tries to grab it to use as a strong-point for their position.

The additional fact that these buildings tend to be located near important locations on the map is also critical for its depth. A game that doesn't feature territory control as an element might not need a detailed garrison system, as the optimal strategy would likely be to bypass the buildings when attacking. But when you have to attack a certain position to deny your opponent resources, the system becomes key to gameplay.

Saturday, October 23, 2010

Company of Heroes-Force Multipliers

This is an article I wrote a couple years ago about the RTS game Company of Heroes. One of the most interesting game concepts found in Company of Heroes is the presence of units that can turn the tide of battle against a much larger army. In most other RTS games, this sort of mechanism is accomplished through a rigid counter system, such as a spearman unit that can kill two light cavalry units, or an archer that can kill two spearman units. Company of Heroes has a much more interesting take on this, where support units like HMGs, buildings, and the map’s terrain itself serve to let a skilled player take advantage of this force multiplication concept. However, you can use the strategies in this article and apply them to almost any game, you just have to look at what methods you can use to defeat a numerically superior force.

HMGs: Heavy machine guns, such as the Wehrmacht MG42 and American .30 cal, are one of the most obvious tools that enable a smaller army to beat a larger one. They get accuracy bonuses against larger groups of troops and can suppress the enemy. This causes troops to crawl around on the ground, lowering their movement speed and making them more susceptible to the firepower of your main infantry, such as Grenadiers. Soon after becoming suppressed, those troops then become pinned, completely unable to fire or move. A well placed MG can stop a large infantry-based attack in its tracks.


MG-42 forcing British infantry to retreat


A 260 manpower brings 2000 manpower in British troops to a halt

Though MGs lose some effectiveness as the game progresses due to the increased availability of indirect fire weapons, such as mortars, howitzers, and doctrine based artillery call-ins, their suppression effect can still be very effective throughout an entire match. A well supported MG can be one of the best tools for stopping the current mainstream tactic of ‘blobbing.’

Tanks: With complete invulnerability to small arms fire and a powerful main gun (and potentially even an upgradeable turret-mounted HMG,) tanks serve as an extremely potent force multiplier for your army. Tanks that have heavier frontal armor, such as Tigers, StuGs, StuHs, and Hetzers, can laugh as weaker projectiles, like bazookas, bounce right off their hood.


A Hetzer watches as a bazooka round bounces off its hull, no penetration achieved


Riflemen and Rangers are forced to retreat with heavy casualties, Hetzer suffered no damage

A tank with infantry support can dish out a lot of damage, while any damage it suffers (short of death) does not cost any resources to repair - it only requires some of your repair crew’s time. In comparison, every soldier your tank kills will cost your opponent Manpower to replace. It’s important to keep in mind that you need to have infantry support with your tank for it to be truly effective and game changing. If you send in a tank solo, it will tend to die unless it is facing inferior forces.

Cover: This is easily the most available and widely used method of force multiplication. Yellow cover is frequently present all over a map in the form of small trees and brush dotted along the ground. Yellow cover gives your forces a moderate amount of protection from gunfire, allowing your squad to take fewer casualties as it faces off against a squad not in cover. Green cover, usually seen in the form of stone fences or hay piles, offers considerably greater benefits. If you have two Grenadier squads in green cover behind a stone wall, they can defeat three charging Riflemen squads. Obviously, the more cover you utilize, the better.


These grenadiers would be in trouble in the open


But behind their heavy cover they defeat these riflemen with ease

However, there are also ways to use the negative cover on the map (which causes soldiers to take additional damage) to your benefit as well. On maps like Semois and Angoville, the roads are common retreat routes. If you position some troops or a MG along these routes, you can easily get a squad kill as your opponent is attempting to flee.

Buildable defenses: Unless you’re playing as British, these tend to be forgotten in terms of improving your position on the map. A well thought out system of fortifications can make your opponent hemmed into a tiny area of the map, losing precious Manpower every time he attempts to leave that area. Each type of defense has advantages that merit individual discussion:

Barbed Wire: Currently, this isn’t used anymore due to the crappy wiring AI of the game, but I hear that this is fixed in the beta so it merits a mention. The point of barbed wire is to deny your opponent easy access to an area, because only weaker units, like Engineers and Pioneers, are able to cut it in the early game, and they suffer increased vulnerability to enemy fire as they do so. It can be built for free and VERY quickly by a variety of units from each side.

If you have secured an important area of the map, you can use these idle troops to sculpt the terrain to your advantage for when your opponent inevitably returns to contest your holdings. You can wire off some of the entrance routes to the area, button-holing him into only one access point, which leaves him as easy prey to a HMG team. You can also take advantage of negative cover on the maps and wire off access to heavy or yellow cover, forcing his infantry to walk down the main road and take additional damage from any troops you have in the area. The infamous ‘Semois Pin’ involved significant use of barbed wire to leave an opponent stuck in his base, unable to do anything of value.

Sandbags: These provide the bonuses of green cover to wherever you choose to build them. They allow for you to fortify open areas of the map, such as the left side of Angoville or many areas of Langres, giving your troops a great deal of protection from enemy fire. Another creative use that players have come up with is to build sandbags at small entrance paths to key areas, such as the high fuel on Sturzdorf. This allows it to function like barbed wire, except that it cannot be cut. In either case, they can allow your army to win against technically superior forces by providing a powerful cover bonus.


Sandbags buy time for this grenadier squad to upgrade a panzerschrek, so they can damage the armored car

Tank Traps: Basically the same as barbed wire, except it is used against vehicles. They are difficult to destroy and allow you to hem your opponent’s vehicles into your anti-tank weapons' kill zones.

Land Mines: These are the buildable defense that I see most often in 1v1 play. They only cost 25 Munitions and have a lot of power for their price - it’s highly recommended to use extra munitions you have on these! Many players do not choose to buy minesweepers, so they continually step on these. There are several varieties in the game - Panzer Elite Tellermines that only trigger on vehicles; regular land mines that trigger on anything and can be built by Sappers, Engineers, and Pioneers; and the more powerful M8 land mines that also trigger on anything.


This sniper took one step too far


Hetzer receives a damaged engine from rolling over a mine. It would now be easy prey for any enemy tanks or anti-tank infantry to destroy

Against Infantry: Mines suppress the squad temporarily, deal a bunch of damage (usually killing at least one squad member) and generally can stop an opponent in his tracks. Mines function as a force multiplier simply because they kill enemy troops as they walk around on the map, but they can be used in support of your troops to work even more effectively. For example, you can put a mine on the obvious flanking route to your MG position, resulting in your opponent’s troops blowing up as they get ready to throw a grenade. They can also be put on critical points, such as the +16 fuel points or the connecting strategic points on Angoville, Victory Points, or on major roads to give you a warning about what your opponent is doing.

Against Vehicles: Land mines do a significant amount of damage to vehicles and also frequently cause engine damage, slowing your opponent’s vehicle to a crawl. This makes them easy prey for a nearby AT gun, Panzerschreck-equipped unit, or a tank of your own. At best, when used with support it can almost guarantee the destruction of that vehicle. At worst, it still puts your opponent’s vehicle out of the fight for a significant amount of time, as he has to move a repair squad out to fix the crippled vehicle.

Buildings: Lastly, I am going to discuss the use of the buildings that are typically spread throughout each map. Though they are frequently used merely to stick a MG in (to provide a more secure base of fire for it,) they have a great deal of value for your ordinary infantry as well. They provide a significant amount of cover that can allow your squad to defeat larger numbers or superior quality opponents.


Out in the open, this rifle squad would be no match for the panzer grenadiers. As it is fortified in a building, the grenadiers must bypass that point to avoid losing men


These volksgrenadiers would normally die in seconds to these infantry squads. Within the building, they can hold out for reinforcements

Also, some squads, such as MP40-equipped Volks and Assault Grenadiers, are devastating to face in the open but do very poor damage to troops in buildings. When you run into these types of troops, you can garrison a nearby building with a Rifle squad or Infantry Section, easily winning the day.

If you approach your CoH game with these ideas of how to make your army work more efficiently to defeat your opponent, your victories will come much easier than they might have otherwise. When using all of these ideas to maximum effect, you will inflict considerable casualties on your opponent while suffering few with your own army. This will drain your opponent of Manpower while preserving your own for teching, purchasing upgrades, or training more soldiers to overwhelm him in later encounters.